How to Set/Change Monitor to 144Hz in Windows 10/11
When purchasing a monitor people always focus on screen size, type of display and resolution. One very important feature which gets unnoticed is the refresh rate. For the unaware, the rule of thumb is to aim for the highest refresh rate possible. Most people are happy with 144Hz as it satisfies their needs and doesn’t put stress on the system.
Unfortunately buying a 144Hz monitor is not enough. You need to adjust the systems to achieve the desired refresh rate. In the following, we look into methods that we can use to enable a refresh rate of 144Hz.
What is Refresh Rate?
Whenever you hear a discussion about which monitor is better their refresh rate comes into play. It is one of the key features which differentiates between a good and a bad monitor. One must understand that a video played on any device is just images being displayed rapidly to give an illusion of a moving picture.
Refresh rate is the number of times an image is displayed on your device per second. This must not be confused with the number of images generated per second by a device, which is the frame rate.
Refresh rate is an important feature and a user would always try to aim to gain the highest rate possible. A high refresh rate helps reduce flickering in the images which provide crisp imagery and has the bonus of reducing eye strain.
What is the Relation of Hz with Monitors?
People think that 120Hz has something to do with the performance, but it’s something different. It is related to the refresh rate.
Refresh Rate can be explained as the number of times an image is refreshed every second. The movement on the monitor is displayed with the difference between frames and refresh rate plays a significant role in it. But the refresh rate is not similar to the frame rate. Frame rate could be called an attribute of the information that is being sent to the monitor while Refresh rate is the attribute of the monitor.
Refresh rate would play a huge difference for gamers. If you are playing a game at 100 FPS (Frames per second), then you would have the benefit of the monitor if it refreshes 100 times every second. But if you are watching a movie at 30 FPS, then a monitor with higher refresh rate would not make much of a difference.
60Hz vs 120Hz vs 144Hz vs 165Hz vs 240Hz
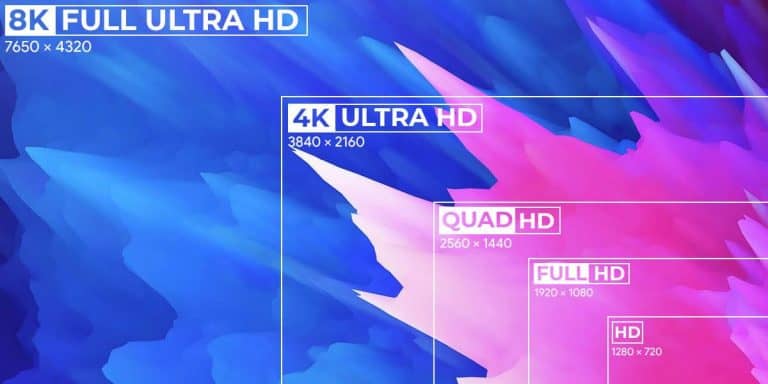
Refresh rate is a defining factor for any display unit. You can vary the refresh rate in many ways to get to a comfortable number. Unfortunately, it is difficult for manufacturers to meet every demand. Therefore, every device with a display will have a refresh rate from the following; 60Hz, 120Hz, 144Hz, 165 Hz and 240Hz.
Each refresh rate has advantages of its own and suited for different users. It is measured in Hertz as it is the measure of the frequency of images. For example, 60Hz means a monitor can display 60 images per second.
60Hz refresh rate is best suited for gamers who cannot afford expensive graphic cards. Games like Assasin’s Creed and GTA run perfectly with this refresh rate. 75Hz is a good refresh rate for gamers into shooting video games like Call of Duty.
144Hz is right in the middle of the spectrum creating smooth image transitions. It is the best refresh rate for gamers and video editors. A clear difference can be noticed between 60Hz and 144Hz. They are a little more costly and require a graphic card of a certain caliber.
A monitor with a refresh rate of 240Hz is a display on steroids. This display is created for people who love a good viewing experience and hard-core competitive gamers. This refresh rate gives a sharper image and original frames.
How to Check Monitor Refresh Rate
The first thing before you set your monitor to 144hz, you must find out your refresh rate. There are a few ways in which you can check the refresh rate of your PC. These steps may vary between different operating systems. The following are the steps for Windows 10/11.
- Right-click anywhere on the desktop and choose “Display settings” or “Display options”.
- In the Display control panel choose “Advanced Display Settings”.

- In the new window under Display Information, you can find out your Refresh Rate.
Recommended: The 7 Best Budget 1440p Monitors
How to Set Monitor to 144Hz on Windows 11
Once you have found the refresh rate of your monitor, you can change your change monitor to 144hz if you aren’t comfortable with the previous refresh rate. Before setting the refresh rate to 144Hz make sure to find out if your processing unit is capable of handling it. If not, setting a high refresh rate will only cause problems like tearing and overheating your CPU.
Following are the steps to enable 144hz on your Windows 11 system.
- Right click on the Windows icon and select “Settings” from the options
- Go to System and then Click on Display
- Scroll down and Select “Advanced display settings”
- Down below you’ll find an option as “Choose a refresh rate”

- Select the desired refresh rate from the drop down.
How to Set Monitor to 144Hz on Windows 10
- Open “Settings” from the Start menu.
- In Settings, click “System” and then choose “Display”.
- In case more than one monitor is connected, choose the one whose refresh rate you need to find out.
- Click on the “Advanced Display Settings”.
- Click on the “Display Adapter Properties”.
- Click the “Monitor” tab.

- In the Monitor drop-down menu choose “Screen Refresh Rate”.
- Select the refresh rate you want and click on “Apply”.
- Once the refresh rate has been changed click on OK.
How to Set Monitor to 144Hz on Windows 8/Windows 7
If you are wondering how to change monitor to 144Hz refresh rate on your Windows 7/8 then you need to follow the following steps. They are similar to the one’s mentioned for Windows 10 with slight variations.
- Close all applications and right-click on the blank space of your Desktop. From the drop-down, choose “Screen Resolution”.
- In the control panel choose “Advanced Settings”.
- In the monitor tab, you will find an option marked “Refresh Rate”. Click on the drop-down and choose “144Hz” as your refresh rate.
- Once done, click on “Apply” and then “Okay”. Your refresh rate should have changed.
Other Tips to Turn on 144Hz
The above-mentioned steps are the answer to how to change monitor to 144hz using the Windows software. In case your monitor is still not able to run at 144Hz then there might be other factors in play affecting the performance. Following are some of the tips that will rectify most of these factors.
1. Change Graphics card Settings
Your Graphics Processing Unit (GPU) has more to do with the refresh rate of your system than the integrated system. If the refresh rate of your GPU does not match with the capability of your monitor then regardless of what setting you choose the required refresh rate won’t be achieved.
But if your GPU and monitor can achieve the desired refresh rate then you just need to open the control panel of your graphics card and the settings. The two common third-party graphics card preferred by users are AMD and NVIDIA. Following are the steps of changing the settings in both GPUs.
a. How to Change Refresh Rate in AMD Radeon Settings
AMD Radeon is a very efficient GPU preferred by many gamers. The following are steps you must follow to change settings that will allow you to run a refresh rate of 144Hz.
- Right-click on the blank space of your Desktop and choose “AMD Radeon Settings”.
- Click on Settings icon from the upper right corner.
- Go to Display and locate Custom Resolution
- Now, click on Create new. A new tab will open

- Locate the Refresh rate option and enter the desired refresh rate.
b. How to Change Refresh Rate in Nvidia Control Panel
NVIDIA is the biggest name in third-party GPUs. It is a powerful device that can run any game without a single problem. Following are the steps to set the NVIDIA driver to run at 144Hz. The following steps should work on both RTX and GeForce.
- Open the Nvidia driver menu. It could be found by typing “NVIDIA” in the Start menu search bar.
- Once in the control panel, find the “Change Resolution” tab under the Display option.
- In the “Resolution” window look for the “Refresh Rate” drop-down menu. If you have more than one monitor connected, then you must choose the monitor you want to change the refresh rate of.
- In the drop-down menu choose the refresh rate of 144Hz. Once done, click okay and your refresh rate should be set.
2. Use the Correct Port
Your monitor will have connection ports that you can use to connect to your CPU. Commonly a display unit will have HDMI ports and Display Ports. Though all of these ports look the same and no physical difference can be seen by the average person, each port may have a different version.
If your HDMI port cannot support anything higher than the 60Hz refresh rate, then you will have to switch to the Display Port and use a Display Port cable. To save time you must check the information guide you get from your display unit to understand the capability of each port.
3. Check the Cable Bandwidth
After using the right port, the next point of importance is using the right cable. You cannot use just any cable lying around from your previous purchases. If you are using your HDMI port then you must use a high-speed HDMI cable for better performance and avoid the older standard cables. When in doubt, go for the HDMI cable which you were provided with the monitor.
If you are using your Display Port, then you need to use a cable that is certified and built to the specifications of your Display Port. A certified cable manufactured for Display Port 1.2 will be able to work with a Display Port 1.4. Any poor quality cable won’t function properly with a different version of Display Port. Steer clear from cables marked RBR (Reduced Bit Rate) which are compatible to support 1080p but will fail to achieve a 144Hz refresh rate.
4. Check GPU Compatibility
Your display unit has to be compatible with your Graphics Processing Unit. If you purchase a monitor which cannot achieve a refresh rate of 144Hz and try to push with an advanced GPU, it just won’t work.
To make things easier, look for a monitor which comes with FreeSync or G-SYNC technology integrated into them. They will pair perfectly with MD/NVIDIA graphic card and run at the desired refresh rate of 144Hz.
There is a way to achieve a refresh rate of 120Hz/144Hz without a high-performance graphics card. The only condition here is that your motherboard must be of a recent generation (7th gen or higher) and must have a display port on its I/O ports.
If your graphics card gives an above-average performance and has at least one display port on it, then again you can achieve a refresh rate of 144Hz. You must make sure that your GPU drivers are up to date.
5. Update your Graphics Drivers
Your Graphics Processing Unit, just like any other computing device, requires a user interface in the form of a driver. These drivers need to be updated regularly to remove any bugs and fix any errors. If not fixed on time these small bugs can become a big problem.

Most of the time these drivers update themselves automatically or give you an alert when an update is available. If you are unable to reach the ideal refresh rate then you must visit your GPU driver and check for an update. You can always visit the website and download the updated driver from there.
6. Adjust In-Game Setting
So far we have changed settings in the operating system, graphics processing unit, checked the ports and the cables. The only place where the problem may prevail is the game itself.
If the graphics settings in your game are not set properly then you won’t feel the refresh rate of 144Hz even though your monitor is giving that output. Adjust graphics settings to the highest resolution and refresh rate to 144Hz and you will notice the difference immediately.
FAQs
Conclusion
We have understood that just buying a 144Hz refresh rate monitor is not enough. There are a few factors to consider in order to reach the highest potential of your display device. If you use the above-mentioned tips then you too can enjoy a smooth viewing experience.