
Fix: Logitech Gaming Software not Detecting Mouse
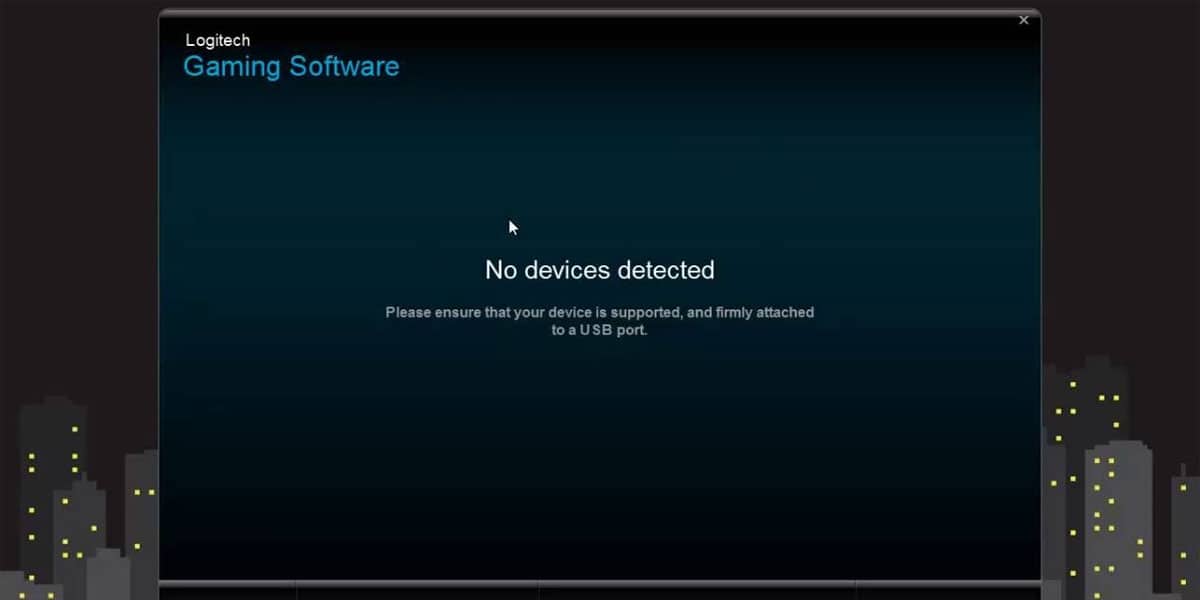
Often in the middle of a perfect gaming session, you’ll get a message which reads, “Logitech gaming software not detecting mouse.” This can leave you annoyed or helpless. Though you get this issue sorted by a miracle, you’ll realize that you have only fixed it for a short period, and once again, your Logitech gaming software is not detecting your mouse. When such problems occur, it primarily is because your USB port (s) has corrupted, or it might be a glitch in the G HUB software.
There’s practically nothing you can do as it is not easy finding out why your Logitech gaming software isn’t detecting the mouse. So, we have compiled a list of all possible fixes that can help eliminate the problem without having to dig into your PC’s hardware.
10 Ways To Fix Logitech Software Not Detecting Mouse
Just when you thought only a regular mouse is prone to problems, you realize that using a gaming mouse is no different. While a gaming mouse may be durable, it is likely to cause the same issues your regular mouse did back in the day. When your mouse cursor fails to remain stable and starts jumping all over your screen or completely stops working, it means that the Logitech G Hub is not detecting your mouse connection.
Therefore, here are ten simple fixes to fix the “Logitech software not detecting mouse” issue for you. Note that these fixes will also work if your Logitech G HUB software fails to detect your keyboard.
1. Run Logitech Gaming Software As Administrator
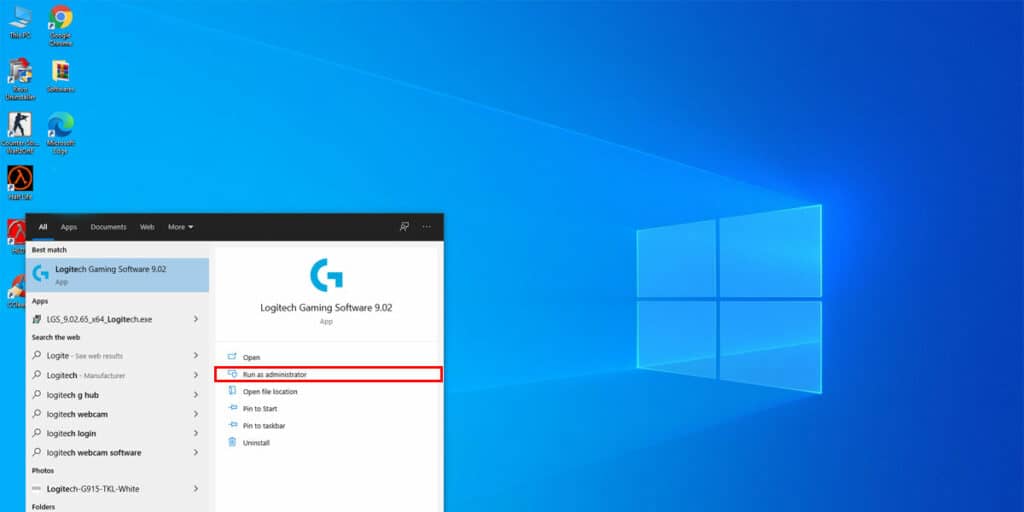
This is one of the most feasible solutions even if you have issues while installing Logitech Gaming Software. Close all the applications from the tray. Right-click on the “Logitech Gaming Software” icon. Click on the option which reads “ Run As Administrator.” If you are starting the application from the “Start” menu, click “More,” and then select “Run As Administrator.”
2. Update Logitech Gaming Software
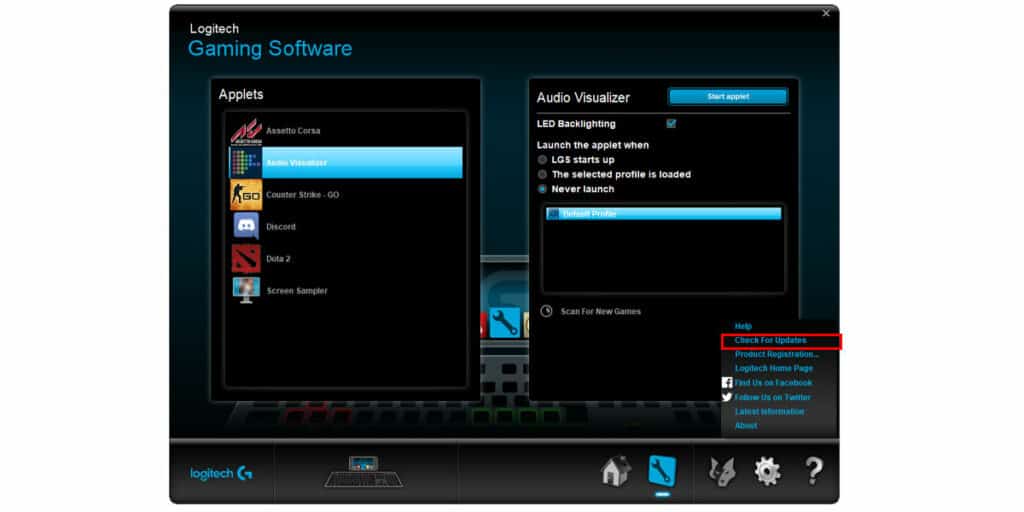
Suppose you haven’t updated your drivers; that probably is why the “Logitech software not detecting mouse” message appears. In some of the latest devices, the updated drivers won’t be compatible with the Logitech gaming software. As a result, you will have to update your G Hub software manually.
To do so, follow the given steps:
Step 1: Close every running application
Step 2: Now open Logitech Gaming Software
Step 3: Click on the arrow above the question mark at the bottom right of your screen.
Step 4: Select the option which reads “Check For Updates.”
Step 5: Tap “Download” to download the latest software module
Step 6: Install your update
Step 7: If you wish to “Restart Now,” ensure that you save your work before hitting Restart.
Step 8: Once the new update is installed, you will notice your Logitech gaming software can detect your mouse.
3. Replace the Batteries
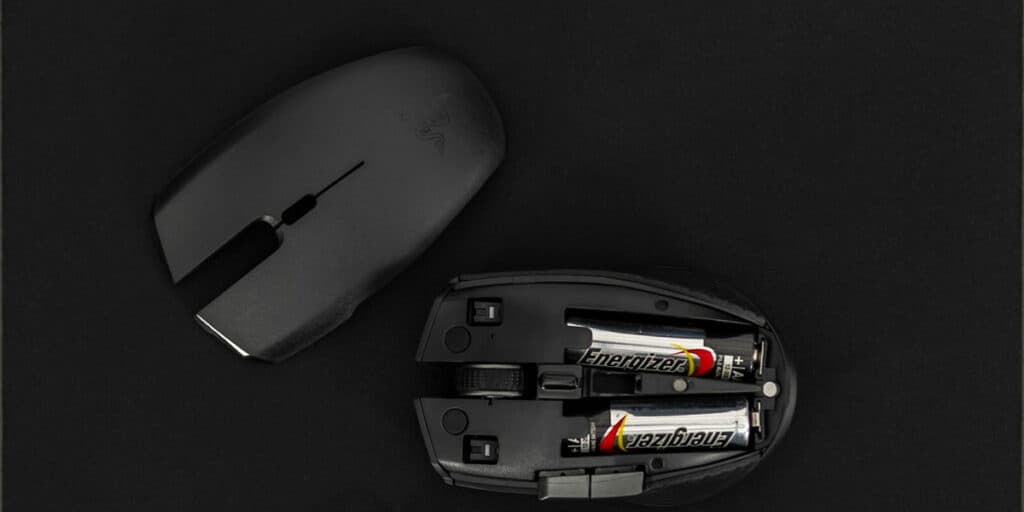
In most cases, people tend to overlook all the basics that may have caused the problem. Checking the batteries is one of them. Prolonged usage of batteries tends to wear them quickly. Therefore, always check your batteries in such cases. Replacing the old ones with fresh ones generally solves the problem.
On the other hand, a long gaming session can cause the batteries to overheat. In such cases, removing them and inserting them back can solve the problem.
4. Check The Cords
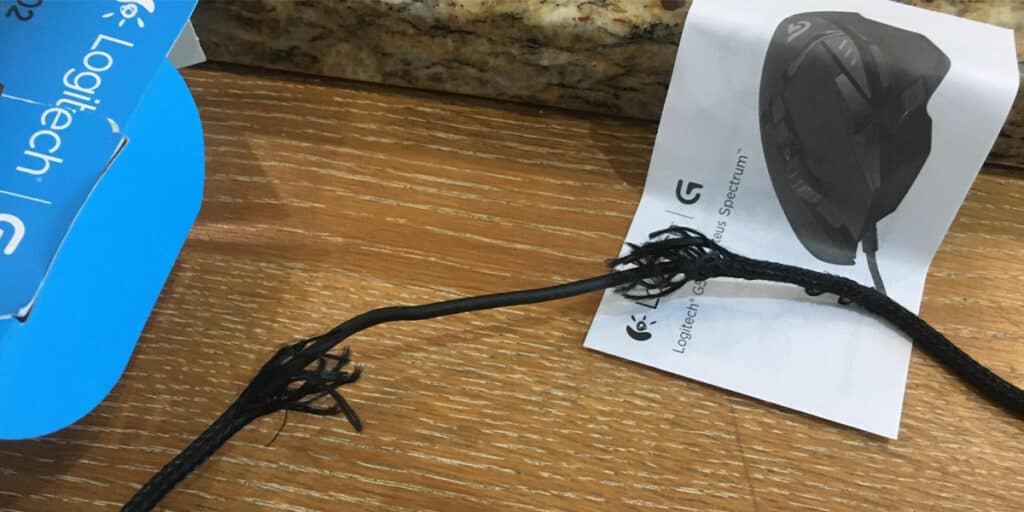
If you’re using a wired mouse, then perhaps you should have a look at the wire (cord) to check for rupture. If you find that the wire is ruptured, loose, bent, or twisted, then that is the reason for the poor connection. In such cases, it is always feasible to get a new mouse altogether.
Similarly, USB ports too can develop rust or get bent over time, in turn, hampering your connection. Check to see if that is the case and fix it to regain your connection.
5. Check The Bluetooth Pairing
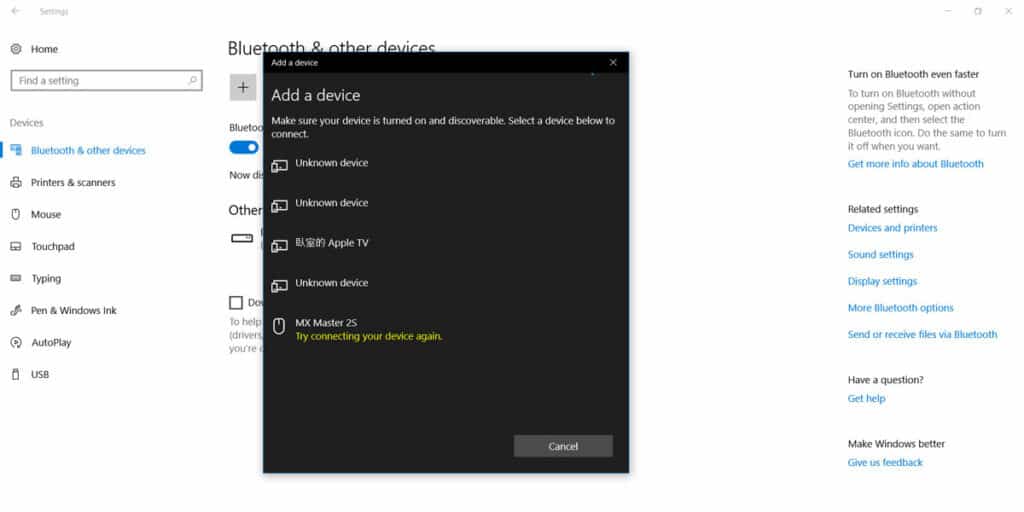
An unstable Bluetooth connectivity could be the reason the Logitech gaming software isn’t detecting your mouse. Before trying any other solution, always check your mouse’s Bluetooth pairing. Often the connection can fail, causing the connectivity failure.
If you cannot pair your mouse upon disconnection, simply click on “Forget Device” and then “Repair.” This works best if you have fewer devices paired with your system’s Bluetooth.
6. Clean Your Mouse
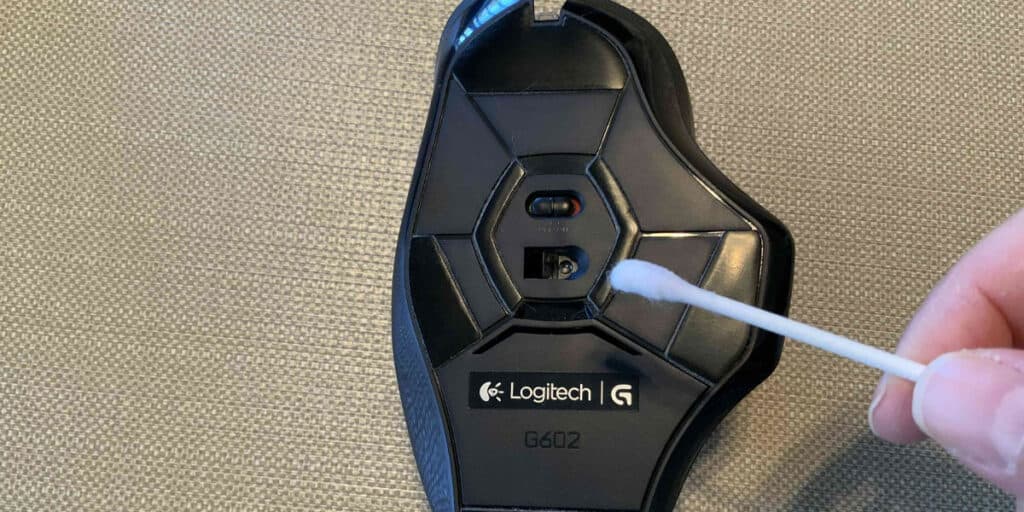
Another fundamental issue we tend to overlook. When the system can efficiently detect your mouse, but your mouse still isn’t working, your mouse needs to undergo a thorough cleanse. Prolonged usage and moisture can cause the mouse to clog. Therefore, cleaning it can help restore the connection.
Note: Always keep your gaming set-up free from debris, liquids, and food particles to prevent malfunction
7. Change Your USB Port
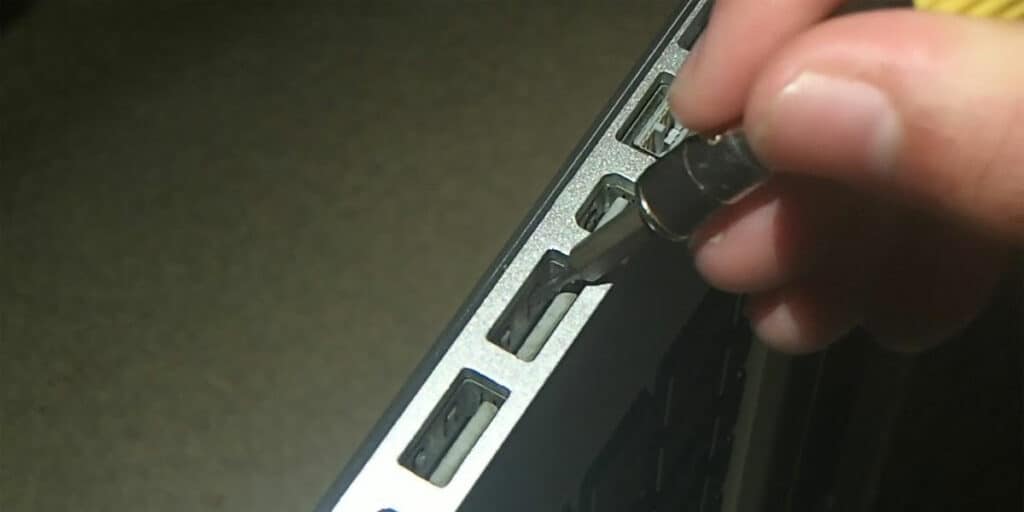
The USB port can wear out eventually after years of usage. If the port has developed rust, is bent, or has got loose, that is precisely why you aren’t getting a solid connection. The majority of the software problems lie within the USB ports.
Unplugging your cord from the current USB port and plugging it into a different port can sometimes solve the problem. On average, every computer will have three additional USB ports. If switching ports still don’t get the job done, then the ports are damaged and need replacement.
8. Run LCore As Administrator
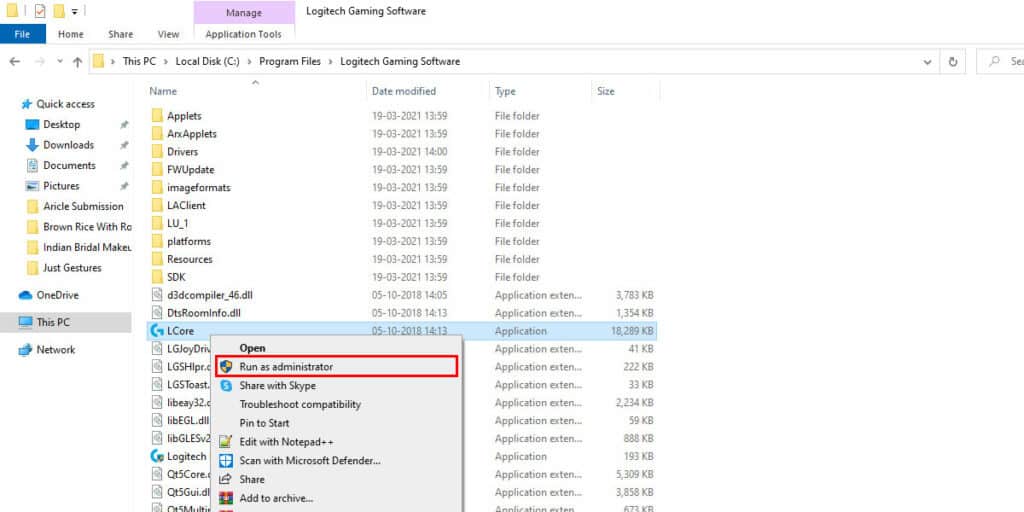
Running your Logitech Gaming Software as Administrator can get the job done. But if the problem persists, then try the following steps.
Step 1: Go to the folder where the Logitech Gaming Software. The default directory is generally C:\Program Files\Logitech Gaming Software.
Step 2: Locate the file titled “LCore.”
Step 3: Right-click on the file and then select “Properties.”
Step 4: Tap on “Compatibility.”
Step 5: Check the box which reads “Run This Program As An Administrator.”
Step 6: Select “Apply” and then press “OK.”
9. Re-install The Logitech Gaming Software
Note that this step is to be used only if all the other mentioned solutions fail. Uninstalling and re-installing the Logitech gaming software is a tedious process. But doing so can help get rid of the “Logitech gaming software not detecting” error on your home screen.
To uninstall the program, follow the given steps.
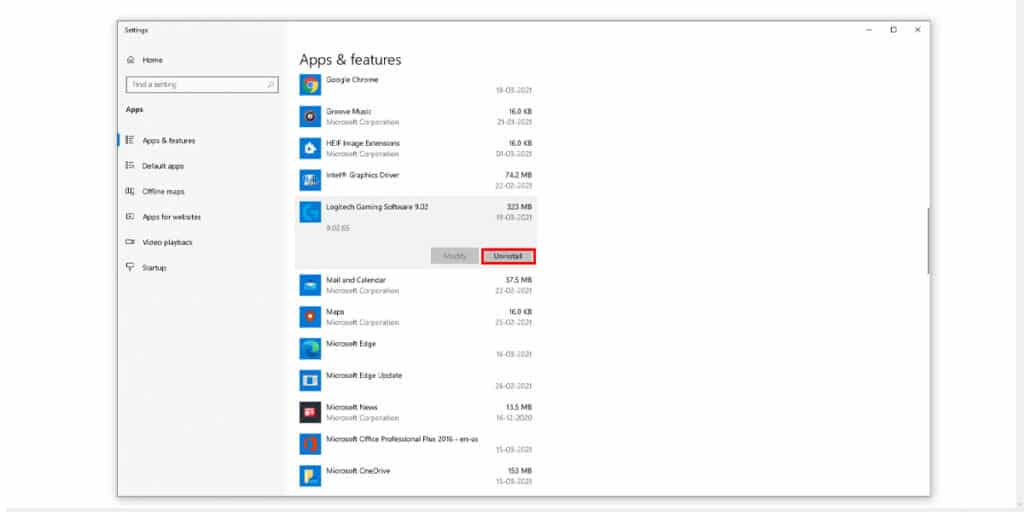
Step 1: In your Windows search bar, type “Add Or Remove Programs.”
Step 2: Select “Add Or Remove Programs.”
Step 3: Under “Apps And Features,” find “Logitech Gaming Software.”
Step 4: Click On “Logitech Gaming Software.”
Step 5: Select “Uninstall” and press “Yes.”
Step 6: Upon completion, click “Finish.”
Step 7: The Logitech Gaming Software is now uninstalled from your device.
Follow the given steps to reinstall the Logitech Gaming Software.
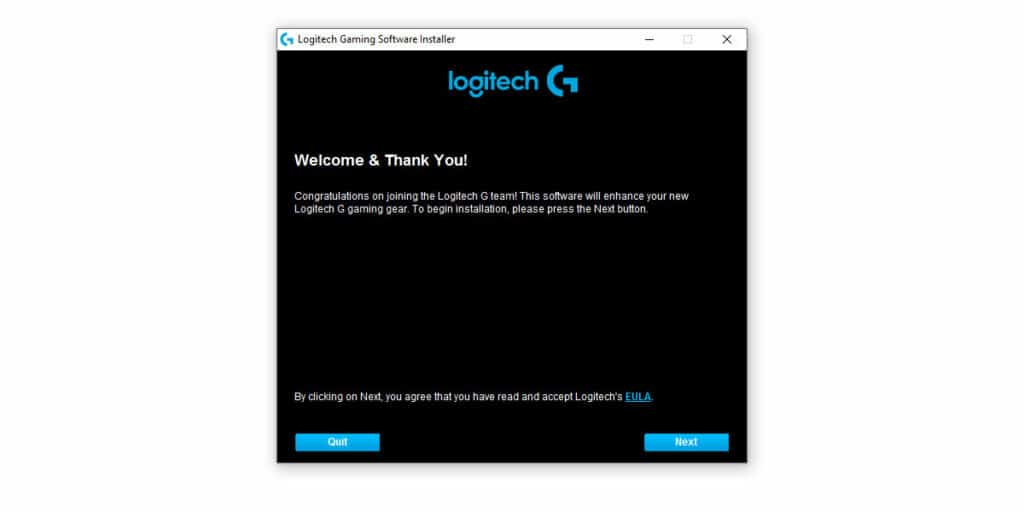
Step 1: Download the file
Step 2: Open the file
Step 3: Read the license agreement and select “I accept the terms in the license agreement.”
Step 4: Click on “Install.”
Step 5: Wait for the installation to complete
Step 6: Upon installation, click “Restart Now” if you wish to restart your PC immediately or else click “Restart Later.”
Step 7: Remember to save your work if you wish the restart your PC after the installation.
10. Update Your Drivers
Updating your drivers from time to time keeps them compatible with all the software changes that take place. If your mouse isn’t working, then it means that it isn’t compatible with the system software, which is why the “Logitech g hub not detecting mouse” error continues to persist. Updating your mouse driver can help with the problem.
To update your mouse driver, follow the given steps.
Step 1: Close all running applications
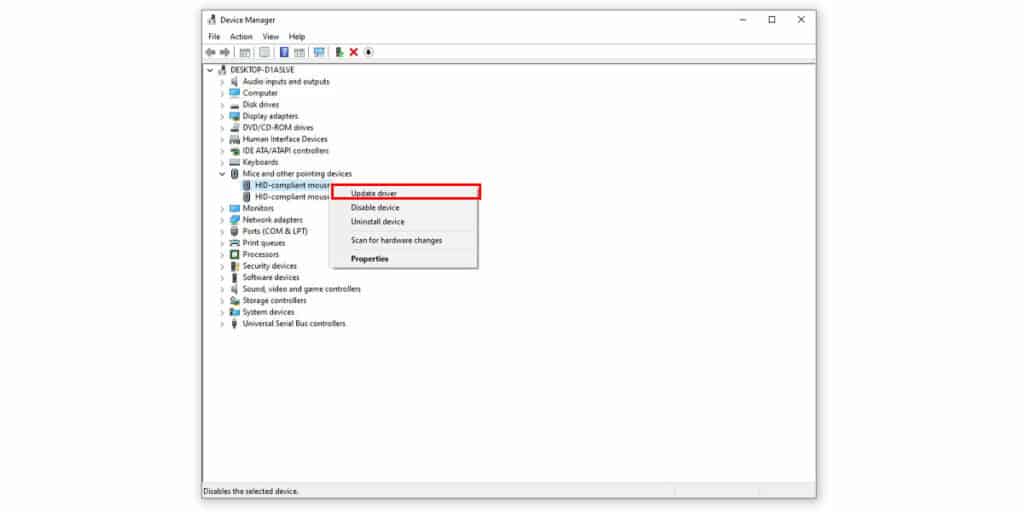
Step 2: Open the “Device Manager” from the start menu.
Step 3: Select the option which reads “Mouse And Other Porting Devices.”
Step 4: Right-click on the “Logitech Entry.”
Step 5: Select “Update Driver Software”
Step 6: Check the box named “Include Subfolders.”
Step 7: Click On “Browse”
Step 8: Locate the “Logitech Gaming Software” folder
Step 9: Select “WinUSB”
Step 10: Press “Ok”
Step 11: Select “Install”
These updates are small and take a minute to install. Upon completion, open the Logitech gaming software to check whether the problem has been solved.
Fix: Logitech Gaming Software Won’t Install on Windows 10
Many times, it happens that the Logitech Gaming Software won’t install on your Windows 10. This is a very common issue and can happen for various reasons like the Logitech Gaming Software is not compatible with Windows 10, the installation files are not downloaded properly, and many more. If you face the same problem and want to know how to solve it, then read on further.
1. Exit Easy Settings Box from System Tray
Many users face issues regarding Samsung’s Easy Settings Box software. Users can use the system monitor by dividing it into different sections.
To solve the problem with Logitech Gaming Software, you have to exit the Easy Setting Box system tray of Windows 10. For this, follow the steps given below:
Step 1: In the right corner of your desktop screen, there is a UP Arrow on the taskbar. Click on it.
Step 2: In the system, select the Easy Setting Box and right-click.

Step 3: Now you see a menu with different options. Select “Exit” from it.
2. Disable Windows Defender or Antivirus
One more reason why Logitech Gaming Software won’t install on Windows 10 can be your Windows Defender. Therefore, to fix this issue, you can disable Windows Defender or Antivirus for Logitech Gaming Software. To disable your Windows Defender, follow the steps given below:
Step 1: Open your computer settings. Search and open the Control Panel.
Step 2: In the Control Panel, find and open the Windows Defender Firewall.
Step 3: Now, there will be an option to “Allow An App Of Feature.” Click on it.
Step 4: After this, a list of application software will appear in front of you.
Step 5: Select Logitech Gaming Software from there and choose the “LCore.exe” file.
Step 6: Now click on OK, and restart your system.
3. Update Windows 10
Even after doing all the above methods, your Logitech Gaming Software won’t install, then you should try updating your Windows OS. The Windows 10 operating system receives various updates. Therefore you have to keep checking for Windows 10 updates. To update your Windows 10, follow the steps given below:
Step 1: Open your systems Settings.
Step 2: In Settings, go to Update & Security.
Step 3: In Update & Security select Windows Updates.
Step 4: Here check if any updates are available. If any updates are available, then download and install them.
Has Your Issue Been Resolved?
We hope that we could help get rid of that annoying “Logitech gaming mouse not detected” error on the home screen. Remember that the older your mouse is, the less are the chances of the fixes mentioned above working for you. In such cases, the best option is to buy a new gaming mouse altogether.
There are plenty of great mice available at affordable prices that can enhance your gaming experience. Let us know in the comment section below if our solutions worked for you and if you have any doubts.