Fix: My Lenovo Laptop Keyboard Won’t Type
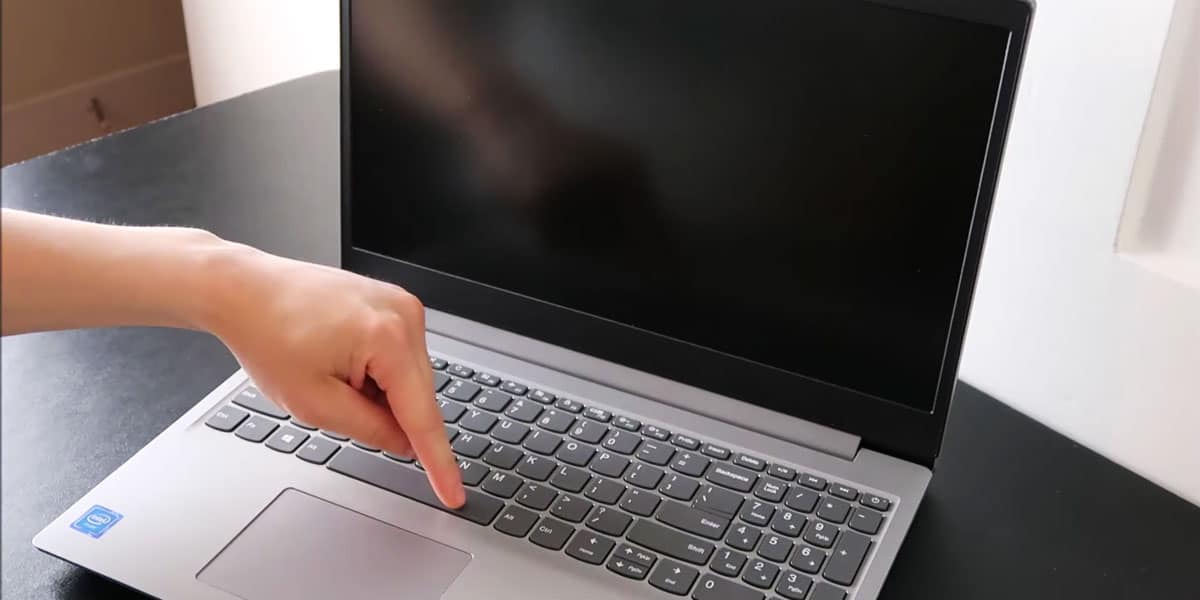
Imagine that you have a report due early morning. Having procrastinated the whole day, you finally get down to it late at night hoping to finish it before the deadline. Determined to finish it early, you start typing as fast as possible.
But halfway through your work, you realize that nothing is getting typed. After aggressively punching your keyboard, the problem still continues to persist. This can leave you red-faced especially when there’s a deadline just around the corner.
The majority of the Lenovo users in the past have reported their Lenovo laptop keyboard not working issue. While Lenovo is one of the highly successful laptop brands, it tends to malfunction at times. If you own a Lenovo laptop and find the Lenovo laptop keyboard won’t type, there could be a majority of reasons behind the same. From an outdated driver to damaged hardware, anything can cause the Lenovo keyboard to not work properly.
In this article, we will walk you through the different ways to fix Lenovo keyboard not working issue.
How to Solve Lenovo Keyboard not Working Issue
As we mentioned above, there could be a lot of reasons why your Lenovo keyboard won’t type. Some of the key primary causes of the same are as follows
- Outdated/Corrupt Device Drivers
- External Keyboard Interference
- Unclean Keyboard Keys
- Damaged Hardware
These are some of the key causes why your Lenovo keyboard won’t type. Here are some of the easy fixes to help you get rid of the problem
Also read: Keyboard Sizes & Layout: The Complete Guide
1. Restart your Laptop
A quick restart goes a long way. Every time you encounter a problem, you should immediately get to restart your computer. Restarting your computer can help get rid of temporary bugs that are affecting your computer. Restart your computer and check if the issue has been resolved.
2. Unlock Lenovo Keyboard
If your keyboard isn’t typing, there are high chances that it is locked. In such cases, you will need to unlock the Lenovo keyboard to get it back up and running. To unlock your Lenovo keyboard, just press & hold the right SHIFT key for 8 seconds. This will enable/disable the filter keys if activated by chance.
3. Run the Troubleshoot Wizard
Every Windows OS comes with a troubleshooting wizard. At times, it could be difficult to manually figure out the problem. In such cases, Windows has a troubleshooter that lets you help find and fix problems with your computer. If you find your Lenovo laptop not working, follow the given steps
- Right Click on the Start Menu & Tap Settings
- Under System select Troubleshoot > Other troubleshooters
- Scroll down to locate the keyboard option & Click on Run
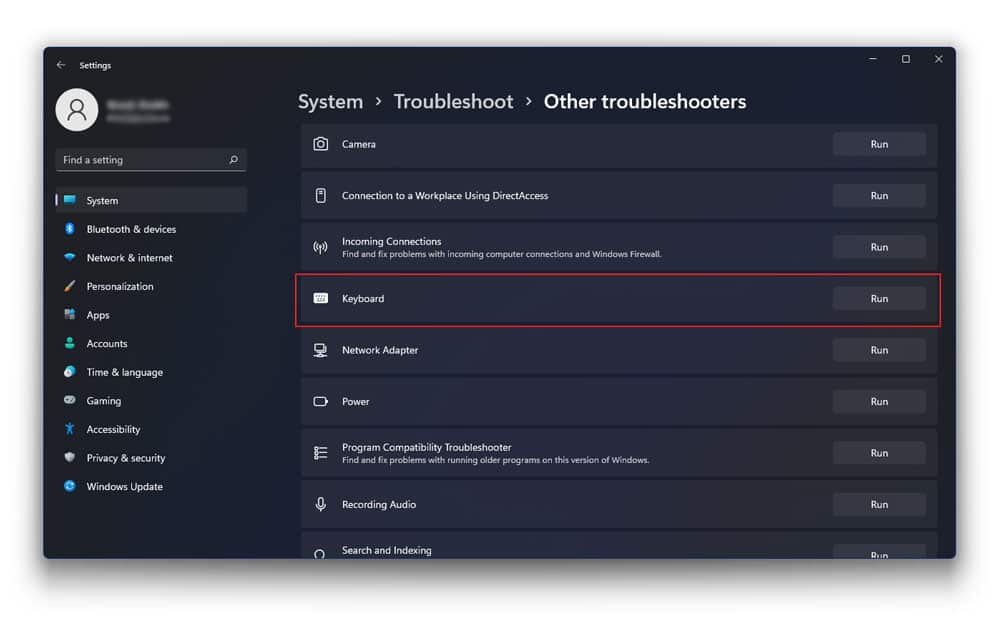
Wait for the Troubleshoot Wizard to launch. The Troubleshoot wizard will now look for problems within your system. Once the wizard is done with, restart your PC to see if the issue has been fixed
4. Uninstall Multiple Keyboards
As we mentioned earlier, there is a higher chance of multiple keyboard interference that can be causing your Lenovo laptop not working. In such cases, you will need to uninstall the multiple keyboards that are present in your system. To uninstall multiple keyboards, follow the given steps
- Right-click on the Start Menu & Tap on Device Manager
- Expand the Keyboards section
- Right-click on the keyboard you wish to uninstall
- Next, select Uninstall Device option from the list of options given
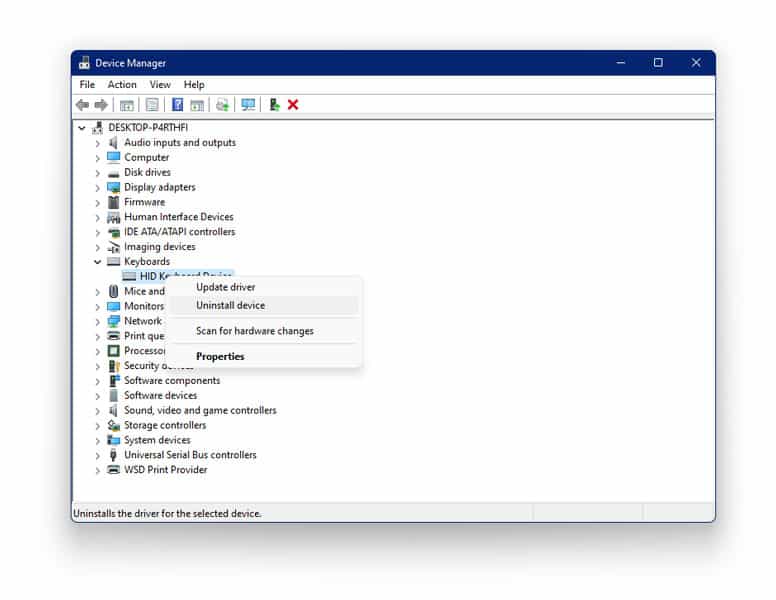
- Repeat the process to uninstall the multiple keyboards on your system
- Once the uninstallation is done, restart your system to check if the problem is done
5. Update Keyboard Drivers
Running an outdated driver is never good. As a result, you have to be on the constant lookout for updates. Once you update your keyboard driver, you automatically get rid of minor bugs and errors that may be present. To update your keyboard drivers, follow the given steps
- Right-click on the Start Menu & Tap on Device Manager
- Expand the Keyboards section
- Right-click on the Lenovo Keyboard Driver & Select Update Driver
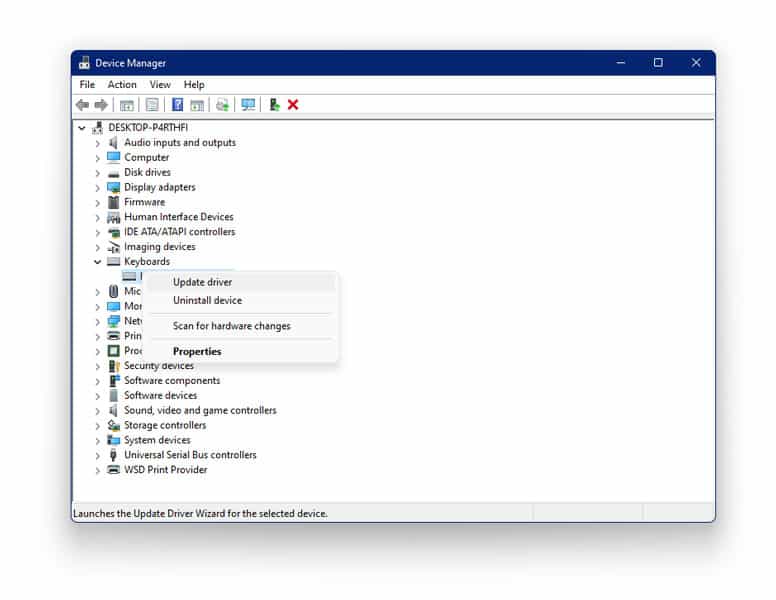
- Next, select the option which reads Search Automatically For Update Driver Software
- Your system will now automatically search and install the latest keyboard driver
Once the update is done, restart your system to see if the problem is taken care of.
6. Change or Switch off Filter Keys
At times, we tend to mistakenly switch off the filter keys. This is very likely to cause your Lenovo keyboard not working. To change the filter keys, follow the given steps
- Search & Select Control panel from the Start Menu
- Go to Ease of Access > Select Ease of Access Centre
- Now, choose the option which reads Make the keyboard easier to use
- Untick the box next to Turn On Filter Keys
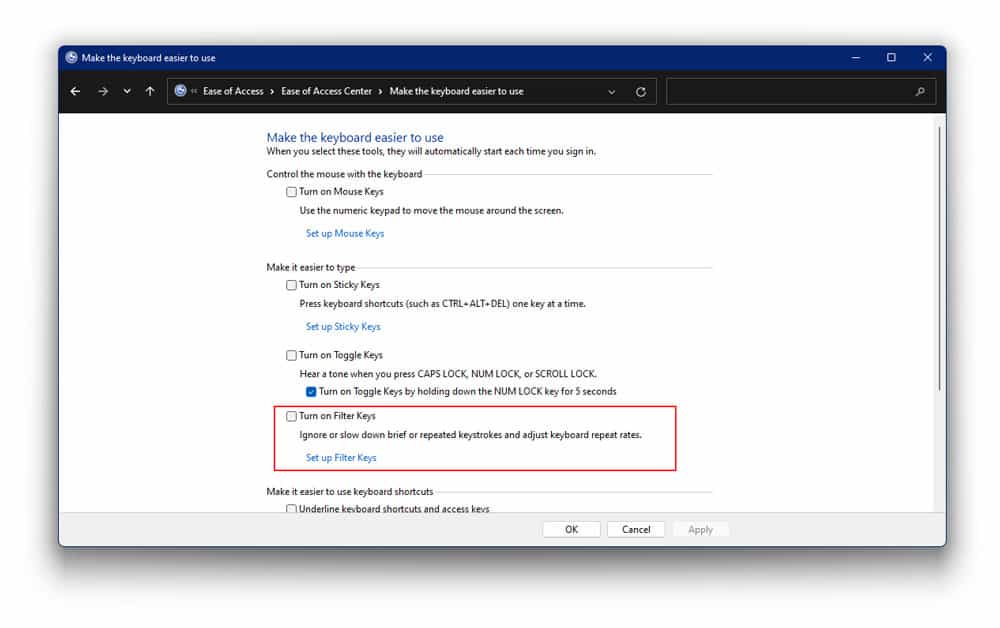
- Click Apply and then OK
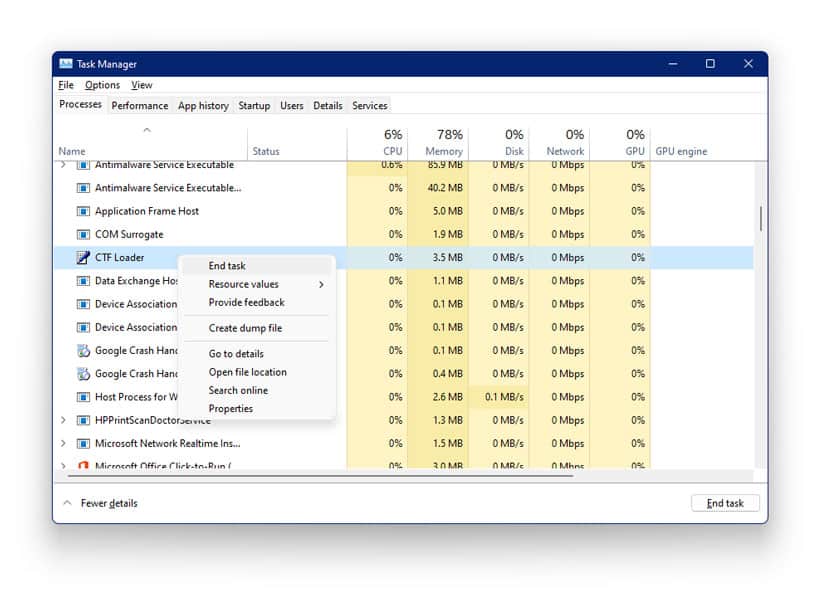
7. End CTF Loader Task
To run the CTF Windows in your Windows 11, follow the given steps
- Right-click on the Start Menu & Tap on Task Manager
- Under Background processes, locate CTF Loader
- Right-click on it & Select End task
8. Run Text Services Framework
Follow the given steps to install and run the text services framework
- Search & Select Task Scheduler from Search Menu
- Expand the Task Scheduler library by clicking on the small arrow
- Then go to Microsoft > Windows > TextServicesFramework
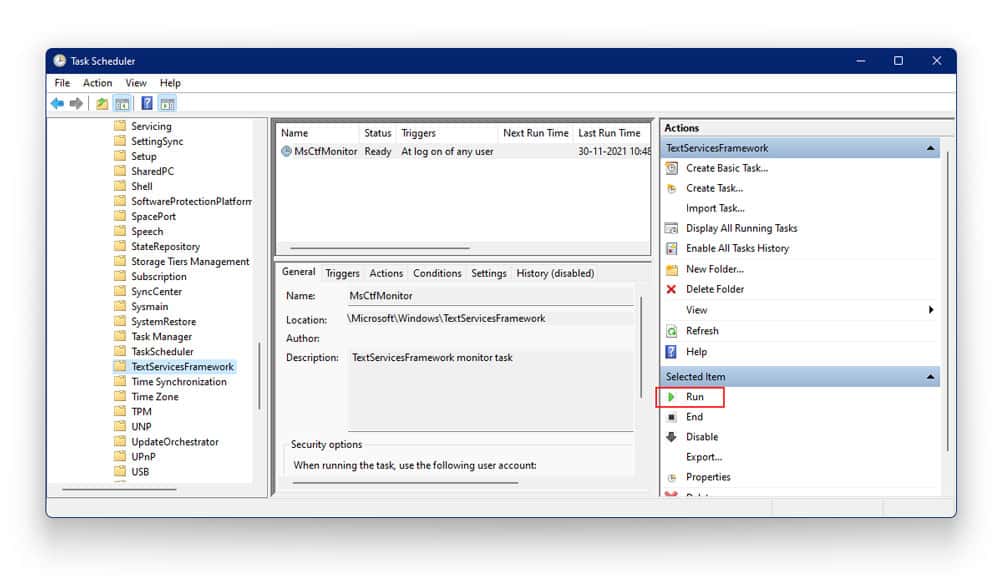
- Click on Run from the Right Panel
9. Reinstall Synaptic Drivers
To reinstall the Synaptics driver, follow the given steps
- Right-click on the Start Menu & Go to Device Manager
- Locate the Synaptic Driver
- Right-click on the Synaptics Driver
- Select Uninstall
- Wait for Windows to finish Uninstalling the program
- Next, click on Scan For Hardware Changes
- Windows will now search and automatically reinstall the Synaptics driver on your system
10. Update Windows
Just like you take care of all your device drivers, you need to pay an equal amount of attention to your OS as well. Microsoft tends to roll out regular updates to take care of potential bugs and errors. To update your Windows, follow the given steps
- Right-click on the Start menu & Select Settings
- Go to Windows Update
- Tap on the option which reads Check for Updates
- Your system will now scan for updates and show you if there are any available updates
- Windows will now automatically install the update. Post completion, restart your system to check if the update worked and the problem has been solved
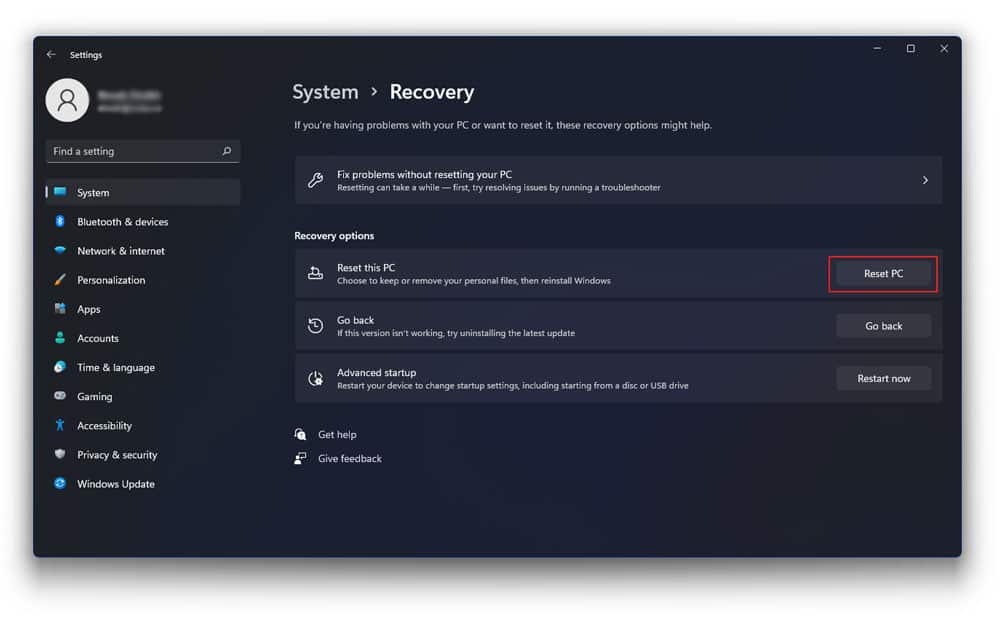
11. Reset your Lenovo Laptop
If none of the steps works out for you, then you probably need to start from a clean slate.
Note: Implementing this step will wipe out every last inch of data on your system. Therefore, ensure you back up all your important files before you reset your laptop.
- Right-click on the Start Menu & Tap Settings
- Go to System > Recovery
- Click Reset PC
- Select the option which reads Remove Everything
- Tap on getting Started
- Follow all the instructions given
Windows will now completely reset. Once the reset is complete, you’ll need to restore everything manually
Conclusion
A stuck keyboard is never a good thing. It can be very off-putting and can completely throw you off track. You can use the above-mentioned guide to tend to your Lenovo laptop if you find your Lenovo keyboard not working. However, if none of the fixes works for you, please see an expert at once.